色々なブラウザを自動で操作してE2EテストができるTestCafeについて。
同じくブラウザの自動操作といえばGoogle製の puppeteer がある。
puppeteer=ChromeだからE2Eテストよりスクレイピングみたいなブラウザ1種類で事足りる用途に向いている(※)。実際E2Eテストが必要な時ってブラウザ1種じゃ済まない場合が多いし、ページ見るときの操作を再現できなければ意味がないので、TestCafeみたいな素でマルチブラウザ対応でAPIも揃ってるやつを選ぶ方が導入が楽である。テストAPIの学習コストは増えるが、テストフレームワークは似たり寄ったりなのでそう苦労しない。
※puppeteerを素で使うよりラッパーのCodecept.jsを使う方が楽でしょう
インストールと起動
ローカルなりグローバルにインストールして、
yarn add --dev testcafe
適当なディレクトリにテストファイル予定地を作り、
test/e2e/sample.test.js
package.jsにscriptsを追加したら、
{
  "testcafe": "testcafe chrome tests/e2e/sample.test.js",
}
コマンド叩く。
yarn testcafe
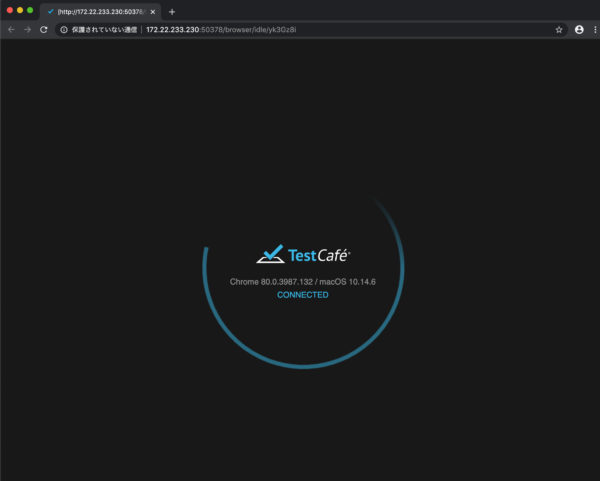
TestCafeのロゴ表示ブラウザが起動したらおk。
コンソールにはエラーが出るが、指定したテストファイルが空だから問題ない。
ERROR No tests to run. Either the test files contain no tests or the filter function is too restrictive.
最初のテスト
sample.test.js にホームにあるh1要素のテキストをチェックするテストを追加する。(内容は適当に変える)
import { Selector } from 'testcafe';

fixture('Sample Test').page('http://localhost:3000');

test('find h1', async t => {
  const siteLogo = await Selector('h1');
  await t.expect(siteLogo.innerText).eql('Sample');
});
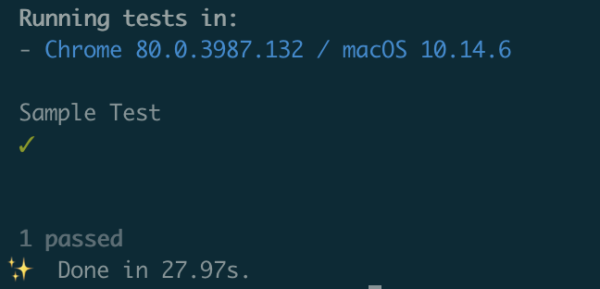
これでまたコマンド叩いて、
yarn testcafe
ブラウザ起動後、成功のログが出たらおk。
以下のエラーで死んでも慌てない。
A request to “http://localhost:3000/” has failed.
Use quarantine mode to perform additional attempts to execute this test.
You can find troubleshooting information for this issue at “https://go.devexpress.com/TestCafe_FAQ_ARequestHasFailed.aspx”.
Error details:
Failed to find a DNS-record for the resource at “http://localhost:3000/”.
これは単純にNuxtが起動してなかっただけである。
TestCafeを動かす前にyarn dev もしくは yarn startでNuxtを起動しておかなければならないのだ。
コメント追加版コード
以下は前のサンプルテストにコメントで説明を加えたもの。
import { Selector } from 'testcafe';

// fixture() →フィクスチャと呼ばれるカテゴリに整理(戻り値fixture object)
fixture('Sample Test')
// fixture.page →開始するWebページを指定
  .page('http://localhost:3000');

test('find h1', async t => {
  // t はテスト実行APIへのアクセスに使用されるテストコントローラー。

  // SelectorにCSSセレクター文字列を渡して要素を識別
  const siteLogo = await Selector('h1');
  // 要素のテキストが同じかテスト
  await t.expect(siteLogo.innerText).eql('Sample');
});
テンプレートリテラルも使える。
fixture`Sample Test`.page`http://localhost:3000`
テストの前後に何かする
fixtureの前後に処理を追加する場合は beforeと after を、
各テストの前後に処理を追加する場合は beforeEach と afterEach を使う。
fixture('Sample Test')
  .page('http://localhost:3000')
  .before(() => {
    console.log('before...');
  })
  .after(() => {
    console.log('after...');
  })
  .beforeEach(() => {
    console.log('beforeEach...');
  })
  .afterEach(() => {
    console.log('afterEach...');
  });
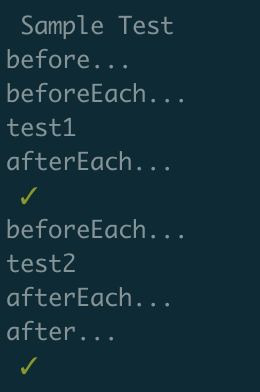
fixtureフックはテスト実行の間に実行されるので、テストされたページにはアクセスできない。
フィクスチャフックはフィクスチャごとに1回実行され、テストフックは実行するブラウザのテストごとに1回実行される。
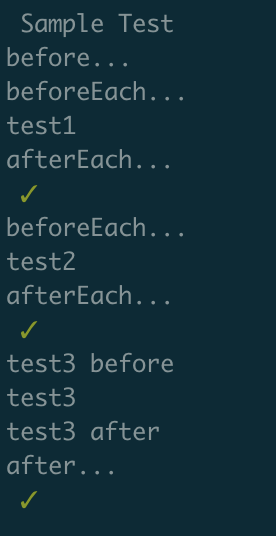
beforeEachとafterEachの上書き
各testにも before と after が使用できる。
この場合、fixtureで設定されたbeforeEachとafterEachは実行されない。
test
  .before(async t => {
    console.log('test3 before');
  })('test3', async t => {
    console.log('test3');
  })
  .after(async t => {
    console.log('test3 after');
  });
以下はbeforeフックでウィンドウサイズを変更する例。
test
  .before(async t => {
    await t.resizeWindow(1280, 823);
  })
最初に起動したブラウザのテスト前後に何かする
TestCafeはカンマ区切りでブラウザを指定すると、各ブラウザでテストが同時に実行される。
testcafe chrome,safari test/e2e/index.test.e
この場合、普通に書いたbeforeやbeforeEachはブラウザの数だけ実行される。
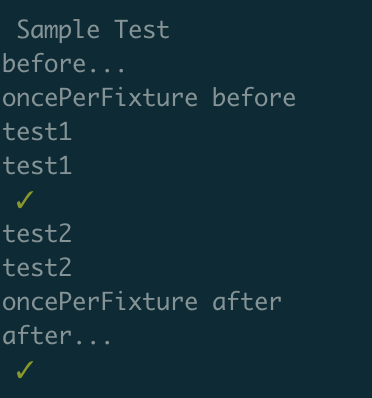
データベースの初期化など、最初に起動したブラウザで実行されたら後に続くブラウザでは何もしなくてもいいような前後処理には testcafe-once-hook モジュールを利用する。
const before = oncePerFixture(async () => {
  await console.log('oncePerFixture before');
});

const after = oncePerFixture(async () => {
  await console.log('oncePerFixture after');
});

fixture('Sample Test')
  .page('http://localhost:3000')
  .before(() => {
    console.log('before...');
  })
  .after(() => {
    console.log('after...');
  })
  .beforeEach(before)
  .afterEach(after);
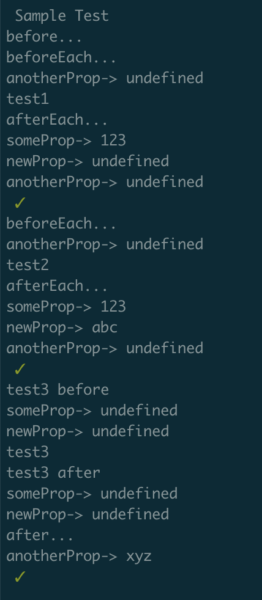
変数の共有
テスト間で変数を使うときは、テストコントローラーの ctx プロパティに追加する。
テストからフィクスチャコンテキストにアクセスするには、fixtureCtx を利用する。
fixture('Sample Test')
  .page('http://localhost:3000')
  .before(() => {
    console.log('before...');
  })
  .after(async ctx => {
    console.log('after...');
    console.log(`anotherProp-> ${ctx.anotherProp}`);
  })
  .beforeEach(async t => {
    t.ctx.someProp = 123;
    console.log('beforeEach...');
    console.log(`anotherProp-> ${t.anotherProp}`);
  })
  .afterEach(async t => {
    console.log('afterEach...');
    console.log(`someProp-> ${t.ctx.someProp}`);
    console.log(`newProp-> ${t.ctx.newProp}`);
    console.log(`anotherProp-> ${t.ctx.anotherProp}`);
  });

test('find h1', async t => {
  console.log('test1');
  const siteLogo = await Selector('h1');
  await t.expect(siteLogo.innerText).eql('Sample');
});
test('someProp', async t => {
  console.log('test2');
  await t.expect(t.ctx.someProp).eql(123);

  t.ctx.newProp = 'abc';
});

test
  .before(async t => {
    console.log('test3 before');
    console.log(`someProp-> ${t.ctx.someProp}`);
    console.log(`newProp-> ${t.ctx.newProp}`);
  })('test3', async t => {
    console.log('test3');
    await t.expect(t.ctx.someProp).eql(undefined);
  })
  .after(async t => {
    console.log('test3 after');
    console.log(`someProp-> ${t.ctx.someProp}`);
    console.log(`newProp-> ${t.ctx.newProp}`);
    t.fixtureCtx.anotherProp = 'xyz';
    await t.expect(t.ctx.newProp).eql(undefined);
  });
テストのスキップ
fixtureないしtestにskipを付け足すだけでスキップされる。
test.skip('このテストはスキップされる', () => {});
逆に only を付け足した場合は、他のfixtureないしテストが全てスキップされる。
test.only('このテスト以外はスキップされる', () => {});
スクリーンショットの撮影
テスト中のスクショやビデオ撮影ができる。
テスト失敗時に自動撮影
-screenshot オプションで takeOnFails フラグを有効にする。
-s takeOnFails=true
設定ファイルやランナーで設定する場合:
{
    takeOnFails: true
}
テスト中にスクリーンショット撮影
takeScreenshot を利用する。
test('takeScreenshot', async t => {
  await t.takeScreenshot();
});
ファイル名はpathで指定できる。
await t.takeScreenshot({
    path: `${t.browser.name}/home.png`
});
fullPage: true でページの全内容を撮影できる。(Safariなど未対応のブラウザがある)
await t.takeScreenshot({
  fullPage: true
});
特定の要素だけ撮影する
takeElementScreenshot を利用する。
await t.takeElementScreenshot(Selector('main'), 'main.png');
コンソールログの取得
getBrowserConsoleMessages を利用する。
戻り値は実行中の全ログが配列になったものなので、Array.find などで特定のメッセージが出てるかどうか確認できたりする。
test('console.log', async t => {
  const { log } = await t.getBrowserConsoleMessages();

  await t
    .expect(log.find(l => l.includes('mounted!')))
    .contains('mounted', 'mounted() 時のconsole.logが表示されてない');
});
リクエストフックの利用
テスト実行中の通信に対して何かしたい場合。
RequestMock
RequestMock はリクエストに対するレスポンスのモックを作成できる。
// test/e2e/request/mock.js

import { RequestMock } from 'testcafe';
import postsData from '../../data/posts.json';

/**
 * DEV API endpoint URL
 * @type {string}
 */
const API_HOST = 'https://example.com/api';


/**
 * Mock Response Header
 * @type {Object}
 */
const responseHeader = {
  'access-control-allow-origin': '*'
};

export const apiMock = RequestMock()
  .onRequestTo(`${API_HOST}/posts`)
  .respond(postsData, 200, responseHeader)
作成したモックを requestHooks でフィクスチャやテストに適用する。
// test/e2e/index.test.js
import { apiMock } from './request/mock.js';

fixture('Sample Test')
  .page('http://localhost:3000')
  .requestHooks([apiMock]);
RequestLogger
ログだけ残したい場合はRequestLoggerを使う。
// test/e2e/request/logger.js

/**
 * RequestLogger
 * @type {RequestLogger}
 */
export const googleApiLogger = RequestLogger('https://www.googleapis.com/');
// test/e2e/index.test.js
import { googleApiLogger } from './request/logger.js';

fixture('Sample Test')
  .page('http://localhost:3000')
  .requestHooks([googleApiLogger]);
RequestHook
カスタムフックを作成すれば、より詳細な処理が作成できる。
// test/e2e/request/custom.js

/**
 * カスタムHTTPリクエストフック
 *
 * @see https://devexpress.github.io/testcafe/documentation/test-api/intercepting-http-requests/creating-a-custom-http-request-hook.html
 */
export class MyRequestHook extends RequestHook {
  constructor(requestFilterRules, responseEventConfigureOpts) {
    super(requestFilterRules, responseEventConfigureOpts);
    console.log(requestFilterRules[0]); // http://example.com
    console.log(requestFilterRules[1]); // /\/api\/users\//
  }
  /**
   * リクエストの送信を処理する
   * @override
   * @param  {RequestEvent.<{requestOptions: 	RequestOptions, isAjax: boolean}>}  event
   * @return {Promise}
   */
  async onRequest(event) {
    console.log(event.requestOptions.url);
  }
  /**
   * リクエストの送信を処理する
   * @override
   * @param  {RequestEvent.<{statusCode: number, headers: Object, body: Buffer>}}  event
   * @return {Promise}
   */
  async onResponse(event) {
    if (event.statusCode === 200) {
      //
    }
  }
}
// test/e2e/index.test.js
import { MyRequestHook } from './request/custom.js';

const customHook = new MyRequestHook(/https?:\/\/example.com/);

fixture('Sample Test')
  .page('http://localhost:3000')
    .requestHooks(customHook);
productionモードでテストする
ここまでは Nuxt.js がdevモードで動いているのを前提にしていた。
devではなくproductionモードでテストしたい時、
テストカフェ実行前にdevサーバー止めて yarn build からの yarn startでlocalhost: 3000を準備しとけば一応できる。
でも都度やるの面倒だからyarn testcafeしたらその辺実行してほしいわけで…
Node.jsのChildProcessで動かすことにする。test/e2e/runner/exec.js 作って、
// test/e2e/runner/exec.js
const { execSync, spawn } = require('child_process');

//最初の挨拶
console.log('Start Nuxt.js build for TestCafe.');

// Nuxt.js
execSync(`yarn build`, { stdio: 'inherit' });

console.log('Start TestCafe.');

// TestCafe
const cafe = spawn('node', ['test/e2e/runner/testcafe.js'], {
  stdio: 'inherit'
});
cafe.on('close', code => {
  if (code !== 0) {
    console.error(`yarn process exited with code ${code}`);
  }
  process.exit(code);
});
test/e2e/runner/testcafe.js で TestCafeのサーバー設定する。
const createTestCafe = require('testcafe');
const selfSignedSertificate = require('openssl-self-signed-certificate');
let testcafe = null;

const sslOptions = {
  key: selfSignedSertificate.key,
  cert: selfSignedSertificate.cert
};

createTestCafe('localhost', 1337, 1338, sslOptions)
  .then(tc => {
    testcafe = tc;
    const runner = testcafe.createRunner();

    return (
      runner
        .src(['./test/e2e/index.test.js'])
        .startApp('node ./test/e2e/runner/server.js', 40000)
        .browsers(['chrome --allow-insecure-localhost'])
        .run()
    );
  })
  .then(failedCount => {
    console.log('Tests failed: ' + failedCount);
    testcafe.close();
  })
  .catch(err => {
    console.error(err);
    testcafe.close();
  });
startApp で実行するための test/e2e/runner/server.js を作成。
ビルドしたNuxt.jsはexpress使ってポート4000で起動させる。
/**
 * testcafe用 expressサーバー
 * @see https://ja.nuxtjs.org/api/nuxt-render
 */
const { Nuxt } = require('nuxt');
const path = require('path');
const app = require('express')();
const PORT = 4000;
const NODE_MODULES = path.sep + 'node_modules' + path.sep;

const cwd = process.cwd();
const rootDir = cwd.substring(0, cwd.indexOf(NODE_MODULES));
let config = {};

try {
  config = require(path.resolve(rootDir, 'nuxt.config.js'));
} catch (e) {
  throw e;
}

config.rootDir = rootDir;
config.dev = false;
config.ssr = true;

const nuxt = new Nuxt(config);
app.use(nuxt.render);
nuxt.listen(PORT, 'localhost');
package.jsonのスクリプトを変更する。
"testcafe": "node test/e2e/runner/exec.js",
yarn testcafeしたらNuxt.jsビルド→TestCafe起動となれば成功。