WordPressのビジュアルエディタに自作したボタンを追加する方法についてのメモです。
TinyMCEのプラグイン作成手順メモにもなっています。
ver2.5以下は確認してないのでどうだか分かりません。多分TinyMCEのバージョンが違うので動かないと思います。
ver2.7は動きました。
ver2.9も動きました。
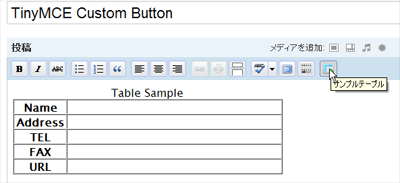
サンプルとして▼こういうテーブルをボタン1発で追加出来るようにします。
| Name | |
|---|---|
| Address | |
| TEL | |
| FAX | |
| URL |
プラグインとかで記事のテンプレートを作っておくという手もあるけど、ボタン挿入の方が汎用的に使えるので楽です。
エディタへのテキスト挿入以外にもいろいろな事がやれます。
結構面倒くさいので初心者向きではありません。
あとついでにエディタ内のスタイル変更についても解説しています。
なお、この方法はTinyMCE Advancedの影響を受けません。
セレクトメニューについて追記
まず下準備ですが、挿入したいソースに含まれる改行コードを全て\nという文字に変換します。
また、 等の必要の無い空白も除去しときます。
▼全部が1行にまとまればOK。
<table width="400" border="1" cellspacing="0" cellpadding="0" class="sample" summary="tinyMCEサンプル用テーブル">\n\n<caption>\n\n\nTable Sample\n\n</caption>\n\n<tr>\n\n\n<th scope="col" width="20%">Name</th>\n\n\n<th scope="col"></th>\n\n</tr>\n\n<tr>\n\n\n<th scope="col">Address</th>\n\n\n<td></td>\n\n</tr>\n\n<tr>\n\n\n<th scope="row">TEL</th>\n\n\n<td></td>\n\n</tr>\n\n<tr>\n\n\n<th scope="row">FAX</th>\n\n\n<td></td>\n\n</tr>\n\n<tr>\n\n\n<th scope="row">URL</th>\n\n\n<td></td>\n\n</tr>\n</table>
editor_plugin.jsというJavascriptファイルを作成して都合のいいところに保存する。
(このサンプルでは便宜的にオリジナルのテーマフォルダ内に保存)
editor_plugin.jsの中身は次の通り。
(function() {
    tinymce.create('tinymce.plugins.SampleButtons', {//プラグイン関数名
		getInfo : function() {//プラグイン情報
		return {
			longname : 'WebTecNote CustomButtons Sample',
			author : 'Tenderfeel',
			authorurl : 'http://tenderfeel.xsrv.jp',
			infourl : 'http://tenderfeel.xsrv.jp',
			version : "1.0"
			};
		},
        init : function(ed, url) {
            var t = this;
            t.editor = ed;
            ed.addCommand('Table01',//コマンドID
		function() {
                var str = t._SampleTable();
                ed.execCommand('mceInsertContent', false, str);
		});
        ed.addButton('Table01', {//ボタンの名前
			title : 'サンプルテーブル', //tileのテキスト
			cmd : 'Table01', //コマンドID
			image : url + '/images/mce_btn01.png'}); //ボタン画像

    	},
        _SampleTable : function(d, fmt) {//挿入するテキスト
            str = '<table width="400" border="1" cellspacing="0" cellpadding="0" class="sample" summary="tinyMCEサンプル用テーブル">\n\n<caption>\n\n\nTable Sample\n\n</caption>\n\n<tr>\n\n\n<th scope="col">Name</th>\n\n\n<th scope="col"></th>\n\n</tr>\n\n<tr>\n\n\n<th scope="col">Address</th>\n\n\n<td></td>\n\n</tr>\n\n<tr>\n\n\n<th scope="row">TEL</th>\n\n\n<td></td>\n\n</tr>\n\n<tr>\n\n\n<th scope="row">FAX</th>\n\n\n<td></td>\n\n</tr>\n\n<tr>\n\n\n<th scope="row">URL</th>\n\n\n<td></td>\n\n</tr>\n</table>';
            return str;
      	  }
		});
    tinymce.PluginManager.add('SampleButtons', tinymce.plugins.SampleButtons);//プラグインID,プラグイン関数名
})();
※ボタンの画像は20x20pxです。
TinyMCE用のプラグインはどれもみんなこんな感じのソースになっています。
次にPHPファイルの方ですが、これはWordpressのために用意するものです。
functions.phpに直接書く方法とWordpressのプラグインにする方法、どちらでもOKなので両方の場合で説明します。
差異があるのはソース前半なので、違う部分だけ分けています。
WordPressのプラグインにする場合
PHPファイルには冒頭のプラグイン用コメントが必須です。
適当に名前をつけてpluginディレクトリに保存したら、以下を追加。(コメント部分は適当に変えてください。)
<?php
/*
Plugin Name: TinyMCE Custom Button Sample
Plugin URI: http://tenderfeel.xsrv.jp
Description: TinyMCEのリッチエディタにカスタムボタンを追加するサンプルソース
Author: Tenderfeel
Version: 0.1
Author URI: http://tenderfeel.xsrv.jp
*/
class SampleMceButton {
function SampleMceButton() {
add_action('plugins_loaded', array(&$this, 'Initalization'));
}
function sink_hooks(){
add_filter('mce_plugins', array(&$this, 'mce_plugins'));
}
function Initalization() {
add_action('init', array(&$this, 'addbuttons'));
}
[/php]
<h2>functions.phpに追記する場合</h2>
初期化時に呼ばれるadd_action関数が変わる。
[php]
class SampleMceButton {
function SampleMceButton() {
add_action('init', array(&$this, 'addbuttons'));
}
function sink_hooks(){
add_filter('mce_plugins', array(&$this, 'mce_plugins'));
}
共通部分
以下はどちらの場合でも同じなので続けてコピペする。
function addbuttons() {
		//編集権限なければスルー
	   if ( ! current_user_can('edit_posts') && ! current_user_can('edit_pages') )
		 return;

	   //リッチエディタの時だけ追加
	   if ( get_user_option('rich_editing') == 'true') {
		 add_filter("mce_external_plugins", array(&$this, 'mce_external_plugins'));
		 add_filter('mce_buttons', array(&$this, 'mce_buttons'));
	   }
	}

	function mce_buttons($buttons) {
	   //追加するボタンの名前(separatorは区切り)
	   array_push($buttons, "separator", "Table01");
	   return $buttons;
	}

	// TinyMCE プラグインファイルを読み込む: editor_plugin.js (wp2.5)
	function mce_external_plugins($plugin_array) {
	   //プラグイン関数名=ファイルの位置
	   $plugin_array['SampleButtons'] = get_bloginfo('wpurl') .'/wp-content/themes/original/editor_plugin.js';
	   return $plugin_array;
	}

}
$mybutton = new SampleMceButton();
add_action('init',array(&$mybutton, 'SampleMceButton'));
?>
ボタンを増やす場合はjsファイルのed.addCommand()とed.addButton()アクションさせる関数を増やす。
合わせてphpファイルのarray_push()に名前を追加。
以上追加したらボタンが表示されると思います。押したらエディタ内にテーブルがドーンと入るはず。

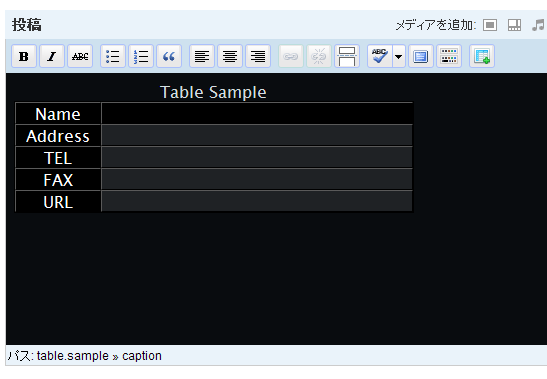
でもなんか寂しい。主に見た目が寂しい。ので、エディタのスタイルもついでに弄ることにします。
TinyMCE Advancedとか使ってもいいかもしれません。
リッチエディタのスタイル変更
エディタのCSSファイルは、\wp-includes\js\tinymce\themes\advanced\skins\wp_theme\content.cssです。
これを編集すれば見た目が変わる。ただしアップグレード等で初期化される可能性があります。

- !important使わないと変わらない部分もある
- marginやpaddingの設定はあまりしない方がいい
- 元のソースでclass名がついてるものは残す
tiny_mce_config.phpを編集する方法
この方法だと他のプラグインも同じように追加出来るっぽいです。
- tinymce/plugins/の中にプラグインのフォルダを作成する。名前はプラグイン名と同じにする。
- editor_plugin.jsとボタン画像、スタイルシート等を入れる
- tiny_mce_config.phpを開いて変数$pluginsの配列内に、プラグイン名を追加する
プラグイン名は、tinymce.PluginManager.add(‘SampleButtons’)←この部分
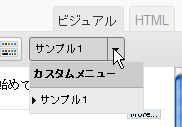
セレクトメニューの追加
手順はボタンとほぼ同じ。

(function() {
	tinymce.create('tinymce.plugins.CustomMenu', {
		getInfo : function() {
			return {
				longname : 'TinyMCE Custom Select-Menu Sample',
				author : 'Tenderfeel',
				authorurl : 'http://tenderfeel.xsrv.jp',
				infourl : 'http://tenderfeel.xsrv.jp',
				version : "1.0"
				};
		},
		createControl: function(n, cm) {
      	  switch (n) {
            case 'myCustomMenu':
                var mlb = cm.createListBox('myCustomMenu', {
                     title : 'カスタムメニュー',
                     onselect : function(v) {
                         tinyMCE.activeEditor.execCommand('mceInsertContent', false, v);
                     }
                });

                //<option>
                mlb.add('サンプル1', this._Sample1());
                return mlb;
		  }
        },
		//挿入されるコンテンツ
		_Sample1 : function(d, fmt) {
			fmt = 'Lorem ipsum dolor sit amet, consectetuer adipiscing elit. Aenean commodo ligula eget dolor. Aenean massa. Cum sociis natoque penatibus et magnis dis parturient montes, nascetur ridiculus mus. Donec quam felis, ultricies nec, pellentesque eu, pretium quis, sem. Nulla consequat massa quis enim. Donec pede justo, fringilla vel, aliquet nec, vulputate eget, arcu. In enim justo, rhoncus ut, imperdiet a, venenatis vitae, justo. Nullam dictum felis eu pede mollis pretium.\n\n';
			return fmt;
    	}
	});
	tinymce.PluginManager.add('CustomMenu', tinymce.plugins.CustomMenu);
})();

貴重な情報どうもありがとうございます。
ボタンを増やしたくて、関数を増やしたのですが、違うようで上手く行きません。
phpの方にも配列は追加しています。
お時間がありましたらご伝授宜しくお願いいたします。
以下、問題のスクリプトです。
functionの区切りにカンマを入れたら解決しました。
お騒がせしました!
カンマは確かに忘れやすいですよねw
記事大変参考になりました。
phpやら理解が不十分な自分ですがすんなり導入できて感激です。
ありがとうございます。
御礼と他の方の参考になればと思い投稿させていただきます。
・TinyMCE Advanced 3.5.8
・Types 1.3.1
・Table Press 1.0
などがインストールされているWP3.5.1環境です。
TinyMCE Advancedは有効/非有効関わらず動いております。
★
プラグインタイプで試したところ、最初うまく動かなかったのですが、
・記事上からphpをコピーした際、一緒に付いてくるインデントに使われている全角スペース?を削除
・phpの44行目あたりにある、$plugin_arrayに代入されているeditor_plugin.jsへのURIを当方環境に合わせて、jsを参照する様に書き換え
したら、動きました。