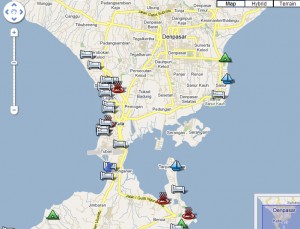
Lightweight Google Maps 1.4.0の固定ページに表示される地図のアイコンをカテゴリーごとに変更する方法のメモです。
locations.phpの修正
155行目位にあるpost_info()にカテゴリー情報(ID)を追加する。
function post_info($lat, $lon) {
	$title = get_the_title();
	$link = get_permalink();
	 //-------------ここから----------------//
	$cats = get_the_category();
	$category = ($cats[0]->category_parent)? $cats[0]->category_parent : $cats[0]->cat_ID;
	//-----------ここまで追加--------------//
	$datetime = get_the_time('U');
	$excerpt = preg_replace('/^\s+/', '', get_the_excerpt());
	$excerpt = preg_replace('/\n.*$/m', '', $excerpt);
	return compact('lat', 'lon', 'title', 'link', 'datetime', 'excerpt', 'category');
}
168行目付近にあるoutput_xml()で出力しているXMLにカテゴリーのタグを追加する。
<category>$category</category>
以下全文。
function output_xml() {
	$encoding = get_option('blog_charset');
	header("Content-Type: application/xml; charset=$encoding");
	echo <<< E__O__T
<?xml version="1.0" encoding="$encoding"?>
<markers>

E__O__T;
	while ($m = array_shift($this->markers)) {
		$m = array_map('wp_specialchars', $m);
		extract($m);
		$date = date(INFOWINDOW_DATE_FORMAT, $datetime);
		echo <<<E__O__T
<marker>
<lat>$lat</lat>
<lon>$lon</lon>
<title>$title</title>
<category>$category</category>
<link>$link</link>
<date>$date</date>
<excerpt>$excerpt</excerpt>
</marker>

E__O__T;
	}
	echo <<< E__O__T
</markers>

E__O__T;
	return;
}
lw_googlemaps.phpの修正
カテゴリーIDによってアイコンを変更するJavaScript関数を500行目付近にあるwindow_content()の前後に追加する。
アイコンはGoogle公式のものがあるのでそれを使用してます。
//カテゴリーごとにアイコンを作成
function get_original_marker(point, catID){
	var Icon = new GIcon();

	switch (catID){
		case "3"://ホテル
		Icon.image = 'http://maps.google.co.jp/mapfiles/ms/icons/lodging.png';
		Icon.shadow = "http://maps.google.co.jp/mapfiles/ms/icons/lodging.shadow.png";
		break;

		case "4"://海
		Icon.image = 'http://maps.google.co.jp/mapfiles/ms/icons/sailing.png';
		Icon.shadow = "http://maps.google.co.jp/mapfiles/ms/icons/sailing.shadow.png";
		break;

		case "5"://山
		Icon.image = 'http://maps.google.co.jp/mapfiles/ms/icons/campground.png';
		Icon.shadow = "http://maps.google.co.jp/mapfiles/ms/icons/campground.shadow.png";
		break;

		case "6"://スパ
		Icon.image = 'http://maps.google.co.jp/mapfiles/ms/icons/hotsprings.png';
		Icon.shadow = "http://maps.google.co.jp/mapfiles/ms/icons/hotsprings.shadow.png";
		break;

		default:
		Icon.image = 'http://maps.google.co.jp/mapfiles/ms/icons/blue-pushpin.png';
		Icon.shadow = "http://maps.google.co.jp/mapfiles/ms/icons/blue-pushpin.shadow.png";

	}
	Icon.iconSize = new GSize(32, 32);
	Icon.shadowSize=new GSize(59,32);
	Icon.iconAnchor = new GPoint(16, 32);
	Icon.infoWindowAnchor = new GPoint(16, 1);

	return new GMarker(point, Icon);
}
独自アイコンはアイコンのファイル名をカテゴリーID.pngとかにして、
テンプレートディレクトリの中に入れれば使えます。
Icon.image = '<?php bloginfo('template_directory'); ?>/images/icons/'+catID+'.png';
次に、create_marker()のGMakerインスタンス作成部分を変更する。
デフォルトソース:
var marker = new GMarker(loc[0]);
変更後ソース:
var marker = get_original_marker(loc[0], loc[2].category);

こんにちは、LightweightGoogleMapsの修正をする上で、とても参考にさせていただきました。
ありがとうございます。
しかし、この内容で修正してみましたが、期待の動作とならない為、ソースを見て考えていたところ、
lw_googlemaps.phpのJavaScript関数parse_loc()も修正が必要であることに気がつきました。
//前略
	var date    = xmldoc.documentElement.getElementsByTagName('date');
	var excerpt = xmldoc.documentElement.getElementsByTagName('excerpt');
	var category = xmldoc.documentElement.getElementsByTagName('category');//追加

//中略
		var desc = {
			'title'  : GXml.value(title[i]),
			'link'   : GXml.value(link[i]),
			'date'   : GXml.value(date[i]),
			'excerpt': GXml.value(excerpt[i]),
			'category': GXml.value(category[i])  //追加(前の行のコンマを忘れずに)
		};
//後略
他に何かありましたらフォローいただければと思います。
以上です。
sa-to さん >
どうやら追加だけして手順に書き忘れてたようです(笑)
コメントありがとうございます 😀
古い記事に参照で申し訳ありません。
こちらの記事を参考にカテゴリーごとにアイコンを変更できたのですが、
ツールチップにタイトルを表示したいのですが、行き詰まっており
お力をお貸しいただけないかと思い、質問させていただきます。
return new GMarker(point, Icon); のところを
var markeropts = new Object();
markeropts.icon = Icon;
markeropts.title = ‘ここにタイトルを代入’;
return new GMarker(point, markeropts);
としてみたのですが、どのようにタイトルを代入すればいいのか分からないのです。
ご教授いただけますと助かります。
何とぞ宜しくお願い致します。
LWGM さん>
get_original_marker() の中でGoogle Mapsのカスタムアイコンを作成しているのはお分かりかと思います。
このサンプルはAPI バージョン2.5以前に書いたものなので、
マーカーを返す部分が return new GMarker(point, Icon) となっているのですが、
この書き方だとGMarkerのコンストラクタで設定出来る引数は GMarker(latlng:GLatLng, icon?:GIcon, inert?:Boolean) という事になります。
http://code.google.com/intl/ja-JP/apis/maps/documentation/javascript/v2/reference.html#GMarker
これにタイトルを追加するのであれば、2.5以降の表記にする必要があります。
2.5以降は GMarker(latlng:GLatLng, opts?:GMarkerOptions) なので、
return new GMarker(point, {icon:Icon})
となり、
return new GMarker(point, {icon:Icon, title:’マーカーのタイトル’})
とオプションを設定すればタイトルも追加されると思います。
Tenderfeelさん
お忙しいところお返事ありがとうございます!
return new GMarker(point, {icon:Icon, title:’マーカーのタイトル’})
これはおそらく、以下と同じことだと思うのですが、
var markeropts = new Object();
markeropts.icon = Icon;
markeropts.title = ’マーカーのタイトル’;
return new GMarker(point, markeropts);
マーカーのタイトルを「どうやって」タイトルを取得してここに入れれるかが分からないのです。。。
var title = GXml.value(markers[i].getElementsByTagName(“title”)[0]);
といった感じで、タイトルを取得すればいいのでしょうか?
map.addOverlay のところにも、titleを指定しなければならないでしょうか??
その前に、var markers = xmlDoc.documentElement.getElementsByTagName(“marker”); が必要???
お手数おかけいたしますが、ご教授いただけますと助かります。
LWGM さん>
そもそもタイトルとして設定したい文字列は何ですか?アイコン名?記事タイトル?
XMLのタイトルを取ろうとしてるので後者と推測すると、
タイトルは既にoutputされるXMLに含まれているので
create_marker()のGMakerインスタンス作成部分を
var marker = get_original_marker(loc[0], loc[2].category, loc[2].title);
(locはparse_loc()の戻り値)
として、
get_original_markerにタイトルの引数を追加
get_original_marker(point, catID, title)
あとは前返答のように
return new GMarker(point, {icon:Icon, title:title})
とすればタイトルが追加されると思います。
記事タイトルです。
教えていただいた通りで実現できました!!!
本当に助かりました。どうもありがとうございました。
はじめまして。
Wordpressもサイト作成も初心者です。
お手すきのときに、お返事いただけるとありがたいです。
当サイトで紹介されている、LightweightGoogleMapsの修正を試してみたのですが、
固定ページで集約されるアイコンが、デフォルトにしかならなくて、悩んでいます。
カテゴリーIDが間違っているのかと思いましたが、
間違っていませんでした。
何か初歩的なミスをしているのでしょうか。
よろしくお願いいたします。